
As a reminder of the AP Wireless solution, please visit this page.
Open this PDF to see different connection setups.
This guide provides the full procedure for optimising your pre-configured AP Wireless unit to deliver a stable, low-latency Wi-Fi link for Nacsport video and data sharing in high-traffic environments.
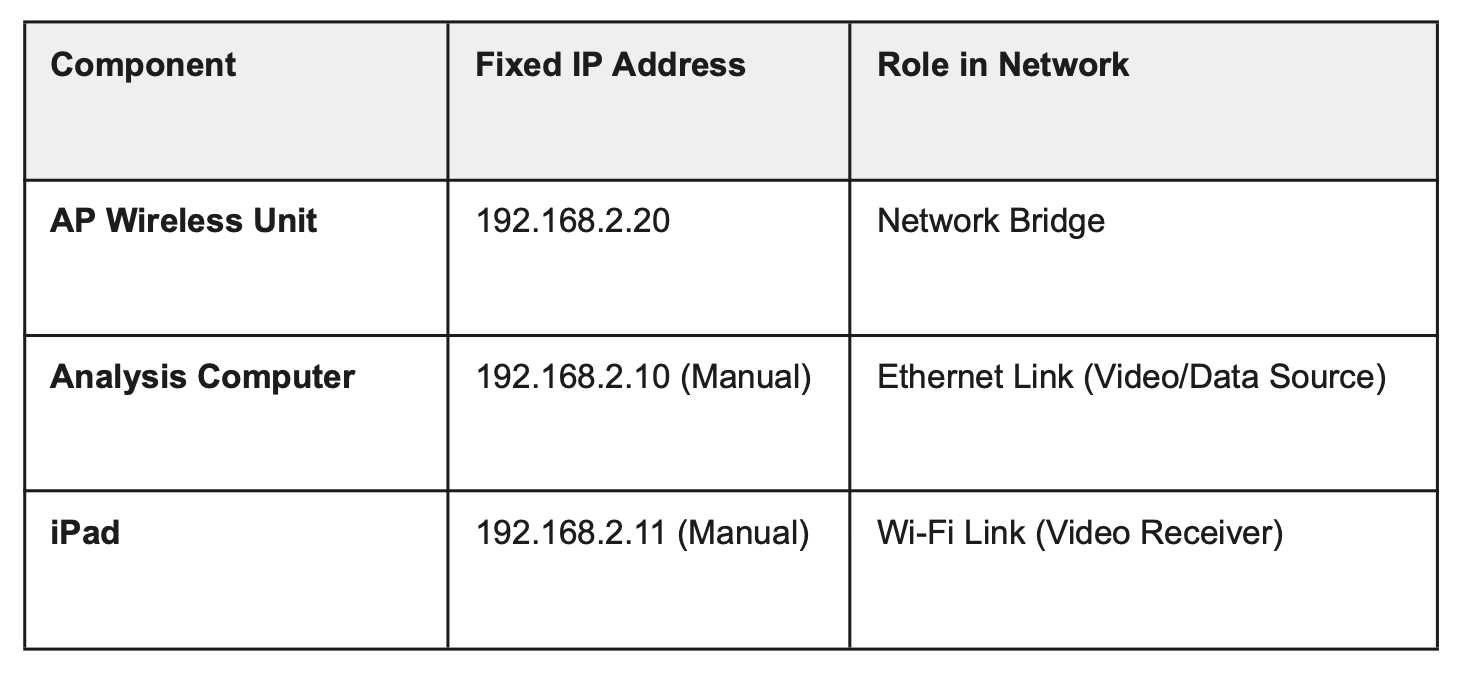
Your AP Wireless unit is set up as a high-performance network bridge with fixed IP addresses.
1. Mount: Place the AP Wireless unit on the supplied tripod, ensuring a clear line of sight between the unit and the typical iPad location. The unit cannot transmit through walls, glass/perspex.
2. Connect AP Wireless: Plug the long Ethernet cable from the back of the AP Wireless unit into the PoE port on the PoE injector and plug that into power. Do this 15 minutes before the start of your event so it has time to scan and find the best channel to use.
3. Connect Computer: Connect your computer to the PoE injector's LAN port via Ethernet cable.
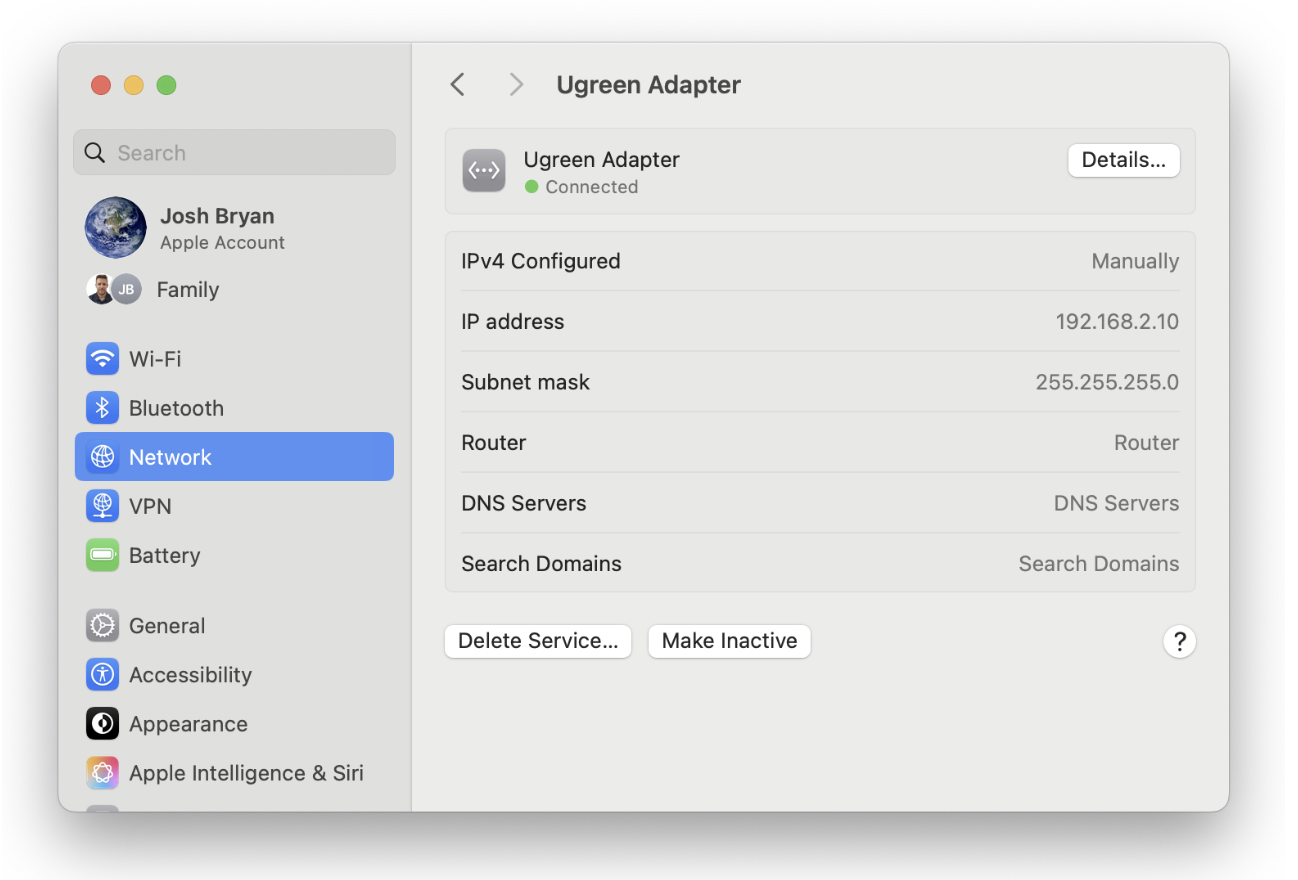
4. Computer IP Check (CRITICAL STEP): Verify your computer's Ethernet adapter is configured Manually with:
○ IP Address: 192.168.2.10
○ Router/Gateway: LEAVE BLANK.
This setting tells your computer to use the Ethernet connection only for local traffic (Nacsport) and to use an active Wi-Fi connection for all internet access.
5. Confirm computer connection to AP Wireless: Open a web browser, navigate to the AP Wireless unit's IP (192.168.2.20) and login (ubnt - analysispro123). If you can login, your computer is connected to AP Wireless via ethernet.
1. Connect: On the iPad, connect to the AP Wireless Wi-Fi network with your password. If you can't see the AP Wireless network on the iPad, wait up to 10 minutes from when you turned on AP Wireless as it may be configuring to a channel that requires this longer setup time.
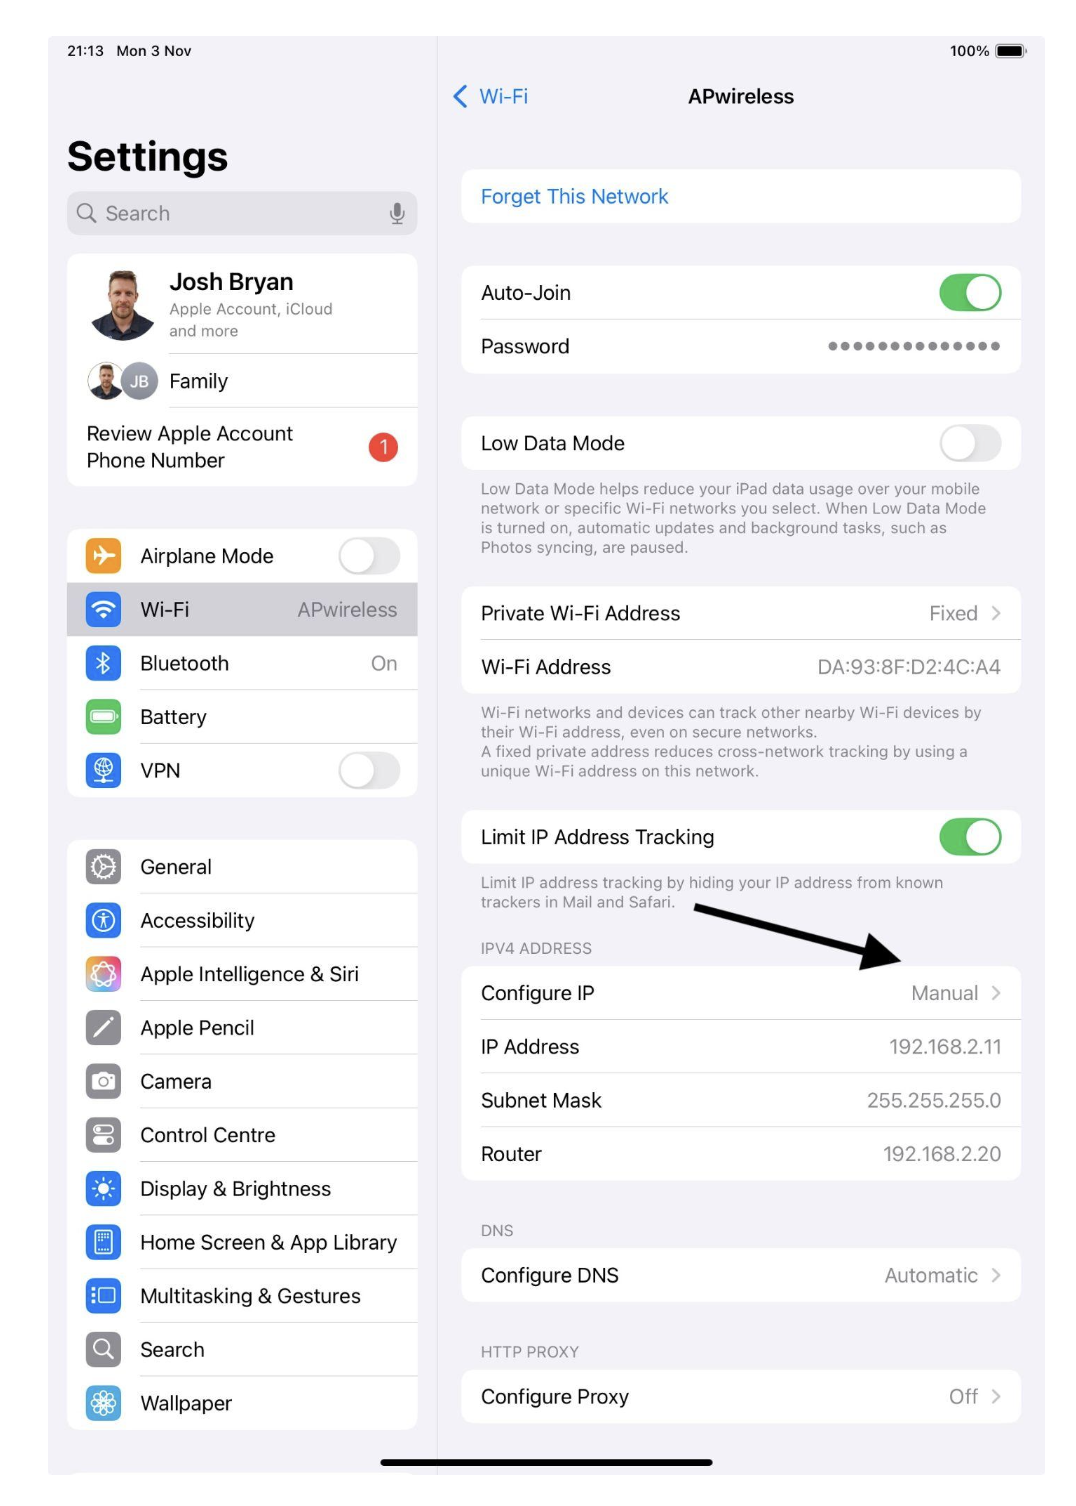
2. IMPORTANT! Configure Static IP: Manually configure the iPad's Wi-Fi settings.
○ Tap the i icon next to the network name, then under the'IPv4 Address' section click on 'Configure IP' and change to 'Manual'. Enter the following values:
○ IP Address: 192.168.2.11 (make sure the last number is different to other devices in your network, .10 and .20 are already used)
○ Subnet Mask: 255.255.255.0
○ Router: 192.168.2.20
○ This connection setup should be saved on your iPad, so you only have to enter these manual settings initially.
Because your unit has been highly optimised to avoid congested stadium radar channels, it will automatically scan and select the best safe channel when you plug it in. You do not need to manually scan for channels.
If your connection is perfect during warmups but drops right before kickoff as the stadium fills up with fans, the airwaves have likely become congested.
Because your unit is pre-configured with a "Safe Zone" auto-scan:
Simply unplug the AP Wireless unit from power for 5 seconds, then plug it back in. * This forces the unit to perform a fresh scan of the busy stadium and automatically lock onto the clearest lane for the match.
You should do this 15 minutes before the event starts, especially as a channel may be selected which has a legal requirement to check for other connections for 1 to 10 minutes before it becomes open, so you may not see the AP Wireless network on your iPad during that time.
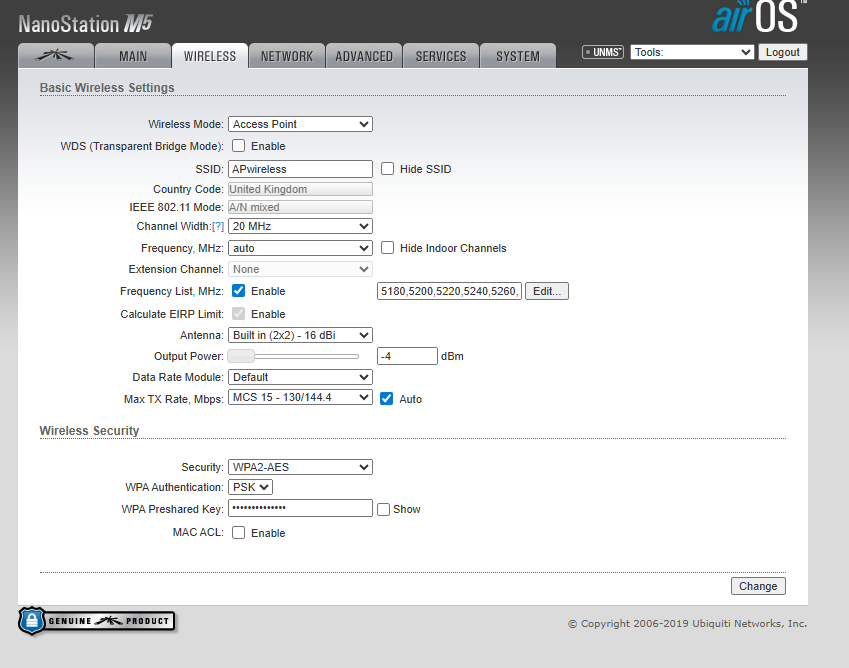
Open a web browser, navigate to the AP Wireless unit's IP (192.168.2.20) and login (ubnt - analysispro123).
Set Minimum Power: Go to the WIRELESS tab and set Output Power to the Minimum: -4 dBm. Click Change and Apply.
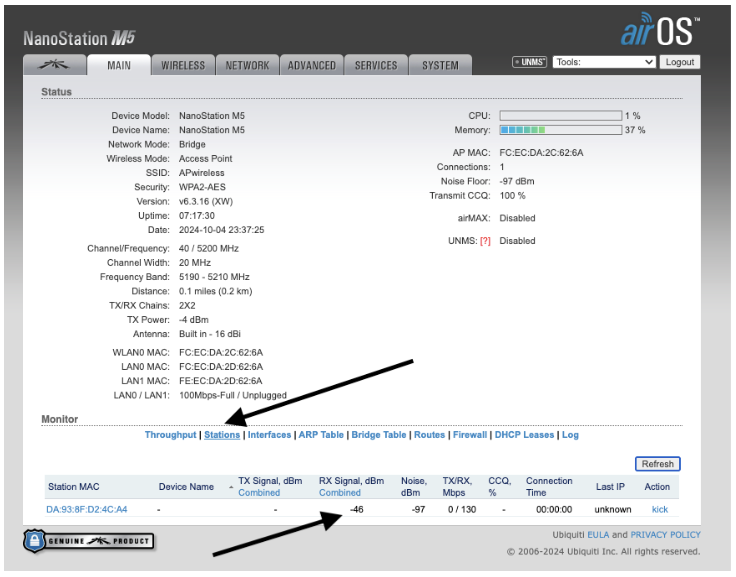
Measure Signal: Go to the AP Wireless unit's MAIN tab and click Stations.
Check RX Signal: Look for the RX Signal, dBm Combined value for your iPad. Our target for high-performance video is between -48 dBm and -52 dBm.
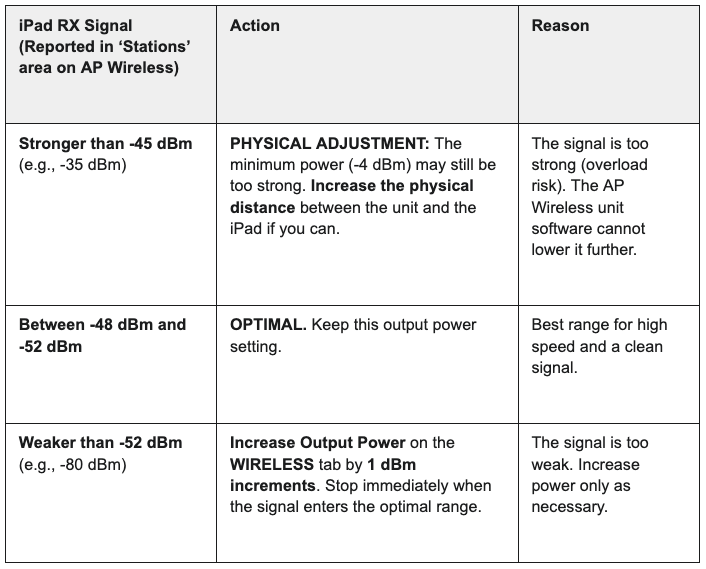
Finalise the power setting once the target is met.
The AP Wireless unit's ACK Timing (Distance in the ADVANCED tab) has been set to the minimum of 0.1 miles (0.2 km) for the lowest latency possible.
If you are deploying the unit for a connection longer than 0.1 miles (approx. 160 meters), you must increase this setting to prevent dropouts:
Log into the AP Wireless unit (192.168.2.20).
Go to the ADVANCED tab.
Manually set the Distance value (e.g., set to 0.5 miles for a 0.5 mile connection).
Click Change and Apply.